|
Size: 2804
Comment: updated instruction
|
← Revision 11 as of 2023-02-15 15:00:26 ⇥
Size: 1474
Comment: removed section about backup; added note about key loss
|
| Deletions are marked like this. | Additions are marked like this. |
| Line 1: | Line 1: |
| ## page was renamed from Gpg4win/Tutorials/CertificateCreation | |
| Line 3: | Line 4: |
| //This tutorial is for Gpg4win 4.0.3. For new versions this process may differ.// | //This tutorial was created for Gpg4win 4.1.0. For new versions this process may differ.// |
| Line 5: | Line 6: |
| If you want to start with encryption it is necessary to create your own pair of keys so that you have a private and a public key. Sometimes they are also called "certificates" which is a term coming from the encryption via S/M~IME. For many users (and especially those who are unsure) encryption via OpenP~GP is the right way. Since Gpg4win/Kleopatra can handle both the certificates and the keys are called certificates in the program. | **under construction** === Introduction If you want to start with encryption it is necessary to have your own pair of keys so that you have a private and a public key. Maybe you already have one but you need to import it. Then you can follow [[Gpg4win/Tutorials/RetrievePublicKeys#file_import|this section]] as it also works with your own key pair. The other way is to create your key pair and this way is shown in this tutorial. \\ Sometimes the keys are also called "certificates" which is a term coming from the encryption via S/M~IME. For many users (and especially those who are unsure) encryption via OpenP~GP is the right way. Since Gpg4win/Kleopatra can handle both the certificates and the keys are called certificates in the program. |
| Line 9: | Line 15: |
| * Click on **File** in the menu bar \\\\ {{open_file_menu.png}} \\\\\\ * Click on **New Key Pair...** in the menu \\\\ {{menu_entry_new_key_pair.png}} \\\\\\ * Click on **Create a personal OpenP~GP key pair** \\ {{choose_key_type.png}} \\\\\\ * In the next window enter your name and the email address the new keys will belong to. \\\\ {{enter_email_name.png}} \\\\\\ * It is also recommended to set a password so activate the checkbox **Protect the generated key with a passphrase.** \\ {{activate_password.png}} \\\\\\ * Click on **Create** \\ {{create_key.png}} \\\\\\ * A small window appears. Here you now have to enter a password/passphrase twice. \\\\ {{enter_password.png}} \\\\\\ * Confirm with a click on **OK**. (Please save your password for example with a password manager like Kee~Pass~XC because if you don't know your password you can't decrypt files and messages so you can't read them anymore.) \\\\ {{confirm_password.png}} \\\\\\ * Now you have two options: ## Click on **Finish** ## Or you go on with the next part of this tutorial (below: //Backup your key pair//) to backup your key pair so you don't forget it later. \\ {{finish_key_creation.png}} \\\\\\ |
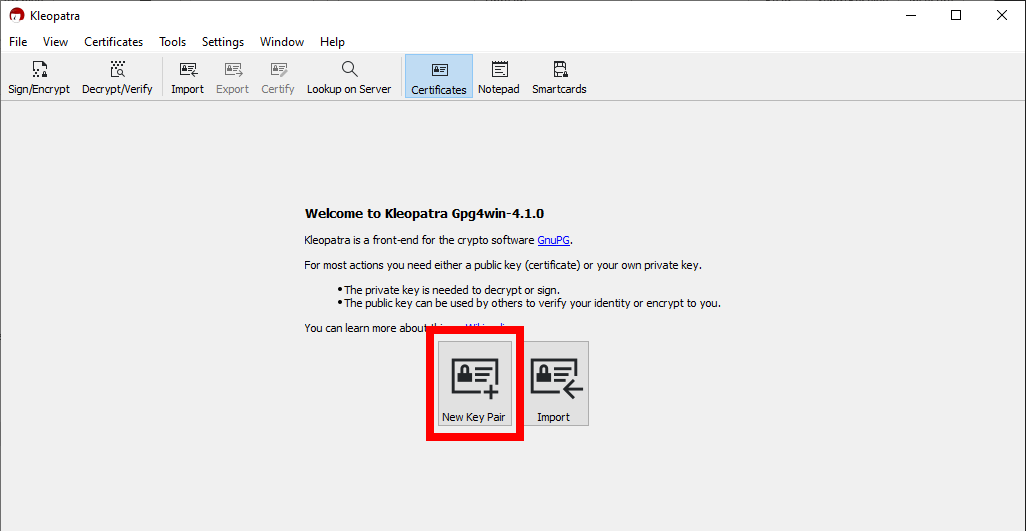
==== Click on "New Key Pair" {{kleo_start_key_creation.png}} |
| Line 48: | Line 18: |
| === Backup your key pair It's great that you chose to backup your keys now because if you didn't maybe you would forget it and if you loose your keys you can never read messages that were encrypted by these keys again. |
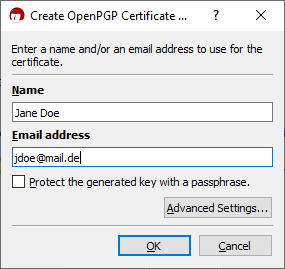
==== Enter your name and email address and click on "OK" {{kleo_enter_name.png}} |
| Line 51: | Line 21: |
| * Click on the option **Make a Backup Of Your Key Pair...** \\\\ {{choose_backup.png}} \\\\\\ * The file explorer will be opened. Here you can choose a folder where your backup will be saved (The place you save the keys to should be on a different device than you normally use e.g. an external hard drive). Then click on **Save**. \\\\ {{select_location.png}} \\\\\\ * Enter the password/passphrase that you chose when you created the key pair... \\\\ {{enter_password_for_backup.png}} \\\\\\ * ... and click on **OK** \\\\ {{entered_password_for_backup.png}} \\\\\\ * The next window explains that the backup was successfully. Confirm with **OK**. \\\\ {{backup_complete.png}} \\\\\\ |
==== When the next window appears confirm with a click on "OK". {{kleo_creation_success.png}} |
| Line 72: | Line 24: |
| \\ **Congratulations! You created and backed up your own key pair.** |
=== Important! A private key is a file on your system that only you or your Administrator may read. If you lose the key you **lose all access to your encrypted data**! === Next steps * Create a [[Gpg4win/Tutorials/KeyBackup|backup]] of your key pair |
Create your own key pair
This tutorial was created for Gpg4win 4.1.0. For new versions this process may differ.
under construction
Introduction
If you want to start with encryption it is necessary to have your own pair of keys so that you have a private and a public key. Maybe you already have one but you need to import it. Then you can follow this section as it also works with your own key pair. The other way is to create your key pair and this way is shown in this tutorial.
Sometimes the keys are also called "certificates" which is a term coming from the encryption via S/MIME. For many users (and especially those who are unsure) encryption via OpenPGP is the right way. Since Gpg4win/Kleopatra can handle both the certificates and the keys are called certificates in the program.
Create the key pair
Click on "New Key Pair"

Enter your name and email address and click on "OK"

When the next window appears confirm with a click on "OK".

Important!
A private key is a file on your system that only you or your Administrator may read. If you lose the key you lose all access to your encrypted data!
Next steps
- Create a backup of your key pair
